
Anime Zero Trait Rerolls: Supernova, Deadeye and When to Stop
Read real Supernova and Deadeye trait screens, compare their build roles, and avoid spending every reroll before choosing a weapon to keep.
FAQ
Which modifier does Ashira use for direct damage?
What is Deadeye’s role in the source build?
Should I stop progression until I get the final modifier?
Is Enchanter a separate system from Trait Reroll here?
Does this guide verify auto-roll protection or pity resets?
When should you spend rerolls on a weapon?
Spend with a clear weapon and build in mind, rather than rerolling every new pull. D1SGUISED describes rerolls as valuable and advises saving them for weapons he intends to keep. Ashira gives a practical middle ground: keep a useful modifier while finishing other upgrades, then pursue the final modifier when your build is ready.
Neither creator proves that one weapon is the permanent best use of every account’s resources. If you are still deciding which kit you enjoy, inspect the weapon comparison and confirm your equipped pair before committing heavily.
What does Supernova add to the source build?
Ashira selects Supernova for several combat benefits working together. His direct-damage setup combines it with an upgraded weapon and Blast Archer Crown. The reasoning is sustained pressure: stronger attacks, quicker attacks and shorter recovery between skills can all matter when an enemy survives the opening skill sequence, provided the attacks actually land.
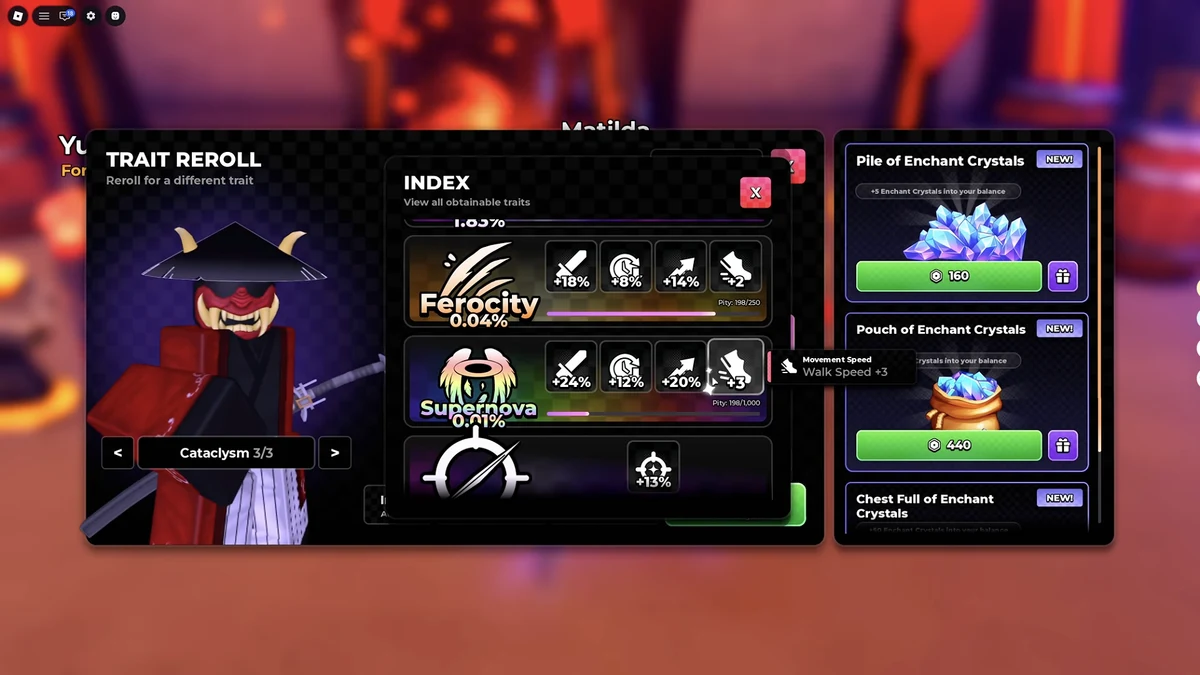
Screenshot: Ashira RBX, 2:37. The recorded Supernova entry shows +24% damage, +12% cooldown reduction, +20% attack speed and +3 movement speed. These are dated screen values, not verified current bonuses.
Ashira names Ferocity and Hunter as alternatives while pursuing Supernova. That gives you a reason to evaluate a useful result instead of assuming every non-final roll is wasted. It does not establish an exact spending budget or a guaranteed number of attempts.
Why choose Deadeye for a critical build?
Deadeye is the source’s choice when the surrounding build supplies critical chance. Ashira pairs it with the critical branch and SunGlasses, distinguishing the frequency of critical hits from how hard those hits land. A large critical-damage bonus alone does not tell you how often you will benefit from it during a run.
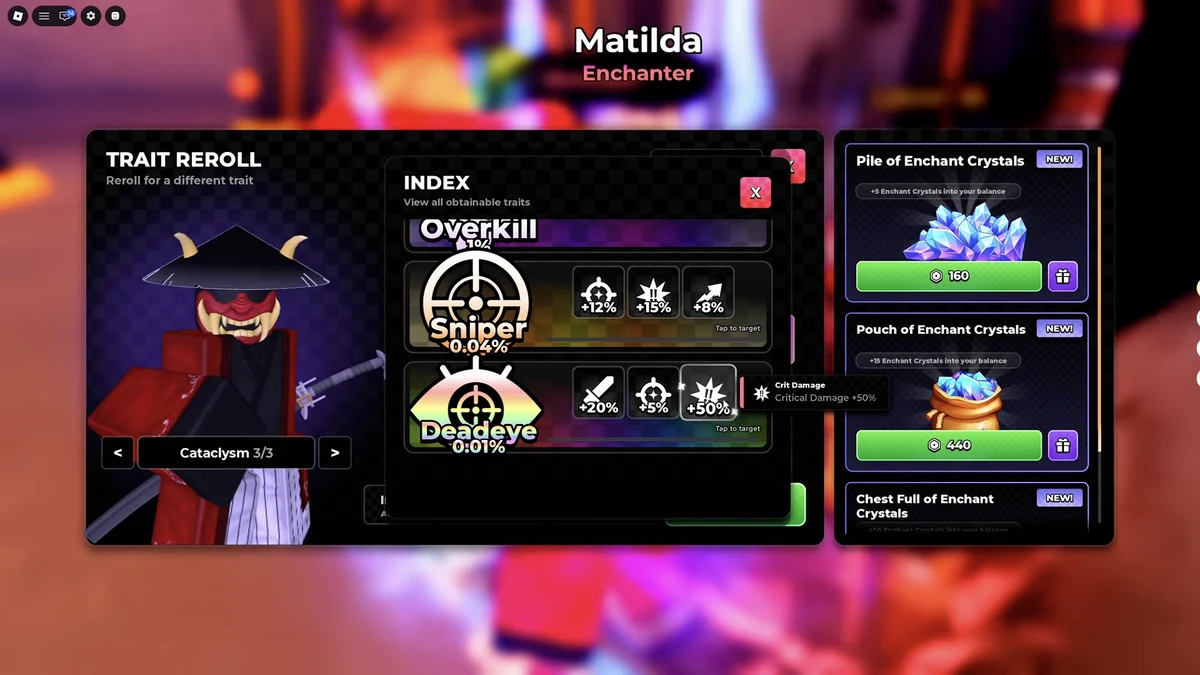
Screenshot: Ashira RBX, 6:09. Deadeye displays +20% damage, +5% critical chance and +50% critical damage in this recording. The tooltip explicitly identifies Critical Damage.
| Source choice | Main build role | What to inspect alongside it |
|---|---|---|
| Supernova | Direct damage, attack speed and skill recovery | Weapon upgrades and the Crown’s complementary bonuses |
| Deadeye | Stronger critical hits | Critical chance from the skill tree and accessory |
| Ferocity or Hunter | The creator’s progression alternatives | Whether your existing result already supports usable clears |
The accessory guide compares the Crown and SunGlasses without treating their direct-damage values as the whole decision.
What should you check before pressing reroll?
Confirm the selected weapon, current result and intended target before spending. The footage identifies the weapon as Cataclysm 3/3 and shows different entries in the index. That visible selection matters: you should know which weapon you mean to improve. This review does not establish that another weapon is protected from every operation.
Use a short pre-roll check:
- Read the selected weapon’s name.
- Read and record its current modifier.
- Identify the improvement you are actually chasing.
- Check your remaining currency and the action’s displayed cost.
- Decide beforehand how much you are willing to spend.
That last step is an editorial budgeting suggestion, not a feature shown in the game. It helps prevent a useful progression session from becoming an open-ended attempt to imitate someone else’s completed account.
Does Tap to target guarantee the next result?
The label alone does not demonstrate that. Deadeye’s entry shows Tap to target, while other entries display pity progress. Those elements indicate options worth investigating in the current client. The reviewed excerpts do not walk through selecting a target, exhausting a counter and confirming the exact result, reset or automatic stop behavior afterward.
Do not read the screenshot’s displayed percentage as proof of a guaranteed waiting time. Likewise, do not assume a lock or target setting preserves an old modifier unless you have checked what that action actually does. Missing behavior stays unverified rather than being filled in from another game’s system.
When is it sensible to stop and play another run?
Stop when further rolls would delay upgrades you can already complete. Ashira recommends progressing with a useful result while working on the skill tree, awakening and gear. If enemies still defeat you during recovery windows, another rare roll may not address the immediate problem as directly as practicing spacing or completing an available upgrade.
Use the Story walkthrough to compare repeatable fights and the skill-tree guide to inspect unspent tokens. For resources, consult the codes page without copying old rewards or assuming rerolls have only one source.
The original segments are Ashira at 2:31–3:29 and 6:00–6:39, plus D1SGUISED at 1:22–2:42. Their advice is attributed player experience, not a controlled test of every modifier.

Ashira RBX — Supernova and Deadeye build roles

D1SGUISED — saving rerolls for a weapon to keep
Related Articles
guides
Anime Zero Accessories: Craft a Crown or Keep Sunglasses?
Compare Blast Archer Crown and SunGlasses in real crafting screens, match gear to your build, and plan materials before using Quick Craft.
guides
Anime Zero AFK Chamber: Check the Timer Before Farming
Read an actual Anime Zero Time Chamber screen and compare two players’ AFK reports without mistaking an old event for guaranteed current rewards.
guides
Anime Zero Beginner Guide: Your First Run and Next Upgrade
Start Anime Zero with a clear progression loop: prepare your loadout, learn Story, check completed rewards and choose upgrades using dated player guides.
Was this helpful?
Thanks for the feedback!